Server Setup
This procedure allows you to use a WeatherCat Client to access your weather station over the Internet.
Five steps:
1. Get a host name from Dyn.com
2. Reserve a local IP Address for the host computer
3. Add Port Forwarding
4. Enable the server in WeatherCat
5. Enter your new host name in the WeatherCat client.
1. Get a host name from Dny.com
Go to dyn.com.
Select DNS.
Select Remote Access DynDNS Pro.
Follow the directions. There is a 14-day free trial available.
A User Guide is provided with the software.
Select a host name (EG yourname.dyndns.org)
Download and install the software on the host computer (the computer that's running WeatherCat.)
Be sure to install and run the Dyn Client as instructed.
2. Reserve a local IP Address for the host computer
A local IP address is assigned by your router to each computer in your network.
You need to have the router assign a reserved IP address for the host computer.
The steps for the Netgear Router N600 WNDR3700v2:
www.routerlogin.net
Select Attached Device under Maintenance.
Find the host computer in the list. Make a note of the MAC Address and Device Name.
Select LAN Setup under Advanced.
Select Add under Address Reservation.
Enter an IP address (EG 192.168.1.101), the MAC Address. and the Device Name. Select Apply.
Disconnect and reconnect the host computer from the router to have the router assign the reserved IP address.
The steps for the Pace 4111N Gateway:
Go to 192.168.1.254 in your web browser.
Select "Settings - LAN - IP Address Allocation"
Select the device that is hosting WeatherCat.
Select Address Assignment: Private Fixed: 192.168.1.101
3. Add Port Forwarding
The steps for the Netgear Router N600 WNDR3700v2 (this and other routers are covered in the Wiki topic Port Forwarding):
Select Port Forwarding/Port Triggering under Advanced.
Select Port Forwarding (usually already selected).
Click Add Custom Service.
Service Name - WeatherCat
Protocol - TCP/UDP
Starting Port - 49250
Ending Port - 49255 (note, image shows 49254)
Server IP Address - The local IP address for the host computer that you reserved in step (2).
4. Enable the server in WeatherCat
Select Advanced in WeatherCat's Preferences.
Check Enable WeatherCat Server under Client Connections.
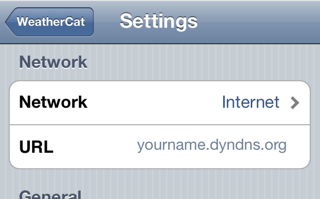
5. Enter your new host name in the WeatherCat client.
Select Preferences or Settings in your WeatherCat client app.
Enter the host name you selected in step (1) into the URL.
Select Internet.
You can now use the WeatherCat client to access your weather station from the Internet.


